September 21, 2012

Furniture Makeover: Shabby Chic White Sideboard


This sideboard actually spent its previous life as the bottom half of a hutch dresser.
Solid pine in that golden colour that is everywhere.
I had already removed all the doors and started prepping it before I remembered to take a before shot.

I thought about the size of it, and who would potentially purchase it, and what they would use it for.  
As my main sales channel is market stalls, transporting a piece of this size is tricky, as is displaying it safely on grass at a market.

My decision was made (only after I had prepped and primed it though.  Oops!)  This hutch dresser was going to become a sideboard.  Lighter, easier and safer to transport and display, and a much more multifunctional piece of furniture that would fit in many more homes than a large 3 door hutch dresser.

I kept it simple with a lovely off white, sealed with wax.


I painted the interior with a water based semi gloss enamel.
I used the original handles, I thought they suited it quite well.


This piece is for sale, details are on my facebook page or you can email me to arrange a viewing

September 20, 2012

Before and After: Shabby Chic Standard Lamp


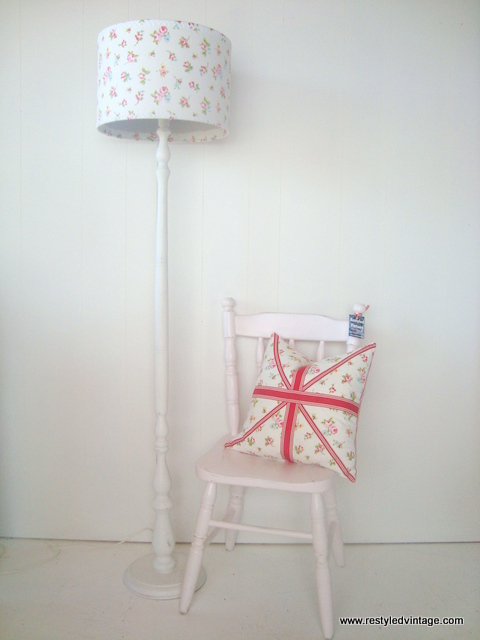
Last week I picked up this standard lamp.  It has been a while since I have done one of these, and this one turned out so cute, I can't wait to find some more!

The 'before' photo is terrible quality I am sorry.
I sanded it back then primed and painted it in my new favourite off white.
 Actual colour is my trade secret though sorry!
I used one of my favourite fabrics on the shade, and trimmed it with white ric-rac.

Here's the lower portion of the lamp stand.

This is for sale, you can head on over the my facebook page for details, or else email me to arrange a viewing.

**edited to add, this lamp has now sold**

freckled laundry

September 18, 2012

Furniture Makeover: Willow Grey Distressed Drawers

I have a set of drawers to show you, but I forgot to take a before shot...oops!

They were just your regular brown stained pine drawers.

Here they are now...
I gave them exactly the same treatment as these bookcases

It is a gorgeous colour, I think, and as I said in the bookcase post, could be beachy or french country depending on how you style it.


I lined the drawers with scrapbook paper.


As you can see in the above picture, the top two drawers don't quite match up.  They work perfectly well but whoever built this set didn't quite make them the same size!  

All adds to the charm I say :)

These are for sale over here on my facebook page or you can email me to arrange a viewing

**15/10/12 edited to add this piece has now sold**

September 3, 2012

A Trash Pack Cake for My Baby Boy

We have had a busy but lovely weekend celebrating my son's birthday on Friday, followed by his party on Saturday, and Father's Day yesterday.  The year he was born, we came home from hospital on Father's Day.  That little boy was the best Father's day present I could ever present my husband :)
I always like to ask my kids what type of birthday cake they'd like, and this year Jake wanted a Trash Pack cake.  Any mother of little boys should know what they are, but for the rest of you, they are funny little squishy plastic characters that apparently live in your rubbish (trash) bin.  The boys take them to school and trade them.  I needed some inspiration for this cake so hit Google, and found a fantastic one here, and knew that is what I wanted to do.  Never mind that when I commented on the blog the author replied that her professional cake decorator friend had made it and it took her two weeks.  I had three days I wasn't going to let a cake beat me!

I knew I needed to make quite a tall cake to get a rubbish bin shape, and although I can bake I decided to  remove some of the stress and use box cakes.  I bought 3 Duncan Hines chocolate cakes, but in hindsight 2 would have been fine (I used the leftover cake batter for cupcakes).  I needed the cakes to have flat tops and I googled to find out how to do that, and came across an excellent tip to wrap the cake tins in a wet towel while in the oven.  It worked!
The following day, after they were completely cooled, I stacked one cake on top of the other, with a cake board from Spotlight in between.  You can see one of the cakeboards underneath - I did have to trim the one in the centre down a bit as I couldn't get a slightly smaller one.  I stuck a bit of fudge icing onto each side of the board to 'glue' the cake on.

Then I covered the sides and top of the cake with the fudge icing (Duncan Hines ready made in a tub).  The reason I used this is because it stays quite wet and sticky which was the consistency I needed to make sure the fondant stayed in place.  It is also delicious!
It wasn't a perfect cylindrical shape but it wasn't too bad.  I just slapped a bit more icing around the centre to fill it out.
I just used ordinary liquid food colouring for colouring the fondant icing.  Black for the grey and green for the green (I thought I may have had to add a bit of yellow to get the lime colour I was after, but I didn't).
Here's how I finished it off:

- I put a couple of drops of black food colouring into one packet of fondant icing, along with some extra icing sugar to stop it from being too sticky, then rolled out the now grey coloured fondant icing on baking paper so it didn't stick to the bench (it also made it easier to pick up without it tearing).

- I stuck the grey fondant icing to the cake in two sections and just wet down the join a little with water to make it blend in.  I gently pushed a bamboo skewer onto the grey icing around the sides of the cake to get the rubbish bin-style lines.

- I rolled out the green fondant so it was bigger than the top of the cake, and cut a wiggly edge around it using a sharp knife, then laid it on top.

Decorating the top was the most fun, and quickest and easiest part of the whole cake.  It consists of a packet of the Trash Pack toys, including the bin that comes with them, some Flake (for dirt), some little fruit lollies, and sour worms.  The sign on the front of the cake is from the cardboard packaging that the toys came in.  I held it on with icing then stuck a couple of sewing pins into it just to make sure it would stay on.
I could have cropped this photo but I thought the mess was pretty funny!  The piece of string on the bench was my measure to make sure I had rolled out the grey long enough to go around the cake.
Here's the party table ready to go.  My boy likes green!

 One of the little boys that came to the party said to Jake 
"Wow, your Mum really knows how to make cakes"...I thought that was so cute!  I guess I just want to show my kids by example that if you want to achieve something/do something/make something, the best way to do that is just have a go.  
I am usually as surprised as anyone at how well having a go can turn out :)

I grew up thinking my Dad could do anything, and that he was very clever.  I still think that.  But I also know now how he got to be so clever at so much stuff...by not being scared to give it a go.  
Thanks Dad, for teaching me this, it has come in very handy! xx

July 5, 2012

Wicker Armchairs


A couple of weeks ago I spotted a pair of these priced at $30 each at one of my local haunts, so I jumped on them!
The covers are pretty special, aren't they?  Besides that, the amount of dust stuck in the weave of the cane could have probably padded another cushion (yuck!) I am finding the air gun attachment for my compressor is so useful for lots of cleaning projects, and this was no exception.  The airgun got rid of all the dust bunnies in no time!

I removed the old covers, turned them inside out, and used them as a pattern for my new covers.
I used my (current) favourite fabric to make new covers for these, but didn't have quite enough so had to use a contrasting fabric for the back of the backs.

I have only done one chair so far, here it is...
I am going to leave the frames unpainted at this stage...who knows how long that will last though ;)
...they would look cute in white...
The first time I used this fabric was on a cushion, which I showed here on my Facebook page, and which also made an appearance in my last post.  I grabbed 4 metres each of the blue and cream versions when it was on sale a few months back, not knowing what I would use it for 
(isn't that half the fun when buying fabric?)
The red gingham I used as the backing for the cushion is sold out and discontinued also, which I am not happy about...I have used it to make lots of things over the years, including these cute little aprons for my daughter's 5th Birthday in 2009, a cupcake party.
It was only 3 years ago, but these girls all look so tiny...wow they have grown lots in that time!
Of course I had to make a matching apron for myself too.
I think I might be the only one that still fits mine ;)
Wow, that was quite a tangent, even for me.  Getting back to the subject, this photo shows the most true-to-life colour of the fabric.  I like to put zippers into all my cushions for ease of removal for washing.  Yes it takes longer at the time but sure beats unpicking a seam later on, or using buttons or velcro as far as I am concerned.
Here are both chairs, sitting on my back deck where they will live.  I still need sort out a better table to put in between the chairs, that little Ikea one really isn't the look I am going for.  I have something on the go at the moment that will probably end up there.

So I still have more sewing to do to finish the other cushions, but I am pleased about how the first one has turned out...it is a nice little spot to enjoy morning tea!

Do you have a favourite fabric you have been using for years?  What do you do when you run out of it, or the shop no longer stocks it?  Console yourself with a shopping trip to the fabric shop? 

Yeah, me too ;)