Showing posts with label How to Distress Furniture. Show all posts

September 10, 2013

China Cabinet for Paula and The Story of the Perfect Vintage Green

Hiya, I am back again with another custom job for Paula - last week I made over her hall stand and this week I have done her china cabinet, both in the same 'vintage' green - a mix of Annie Sloan Duck Egg and Antibes Green.  
I know I am like a dog with a bone about this colour lol - but it really is the most gorgeous green - I just stumbled across it by accident, while having a play with a couple of Annie Sloan paints I had on hand a couple of months ago.  When the mixture is wet it looks nothing like the finished, waxed colour, so it was all a bit of a gamble really.  I do like to jump into things with both feet so instead of trialling it a small piece (which would have been rather sensible), I launched straight into this bookcase.  

As you do.  

Thankfully I loved it as soon as the paint hit the timber, and I was so excited when I saw the colour going on, then when it dried, that I just had to get it distressed to see how it would look...even though it was dark outside! 
(I have a great workshop but distress my furniture outside, it creates far too much dust to do it inside). 

Please tell me I am not the only one to get so excited about painting a piece of furniture that I continue working on it in the dark??? ;)

It seems a lot of you loved the colour as well - the bookcase sold straight away and many people left comments on my Facebook page saying nice things about it - thank you!

I went on to paint this desk, a dolls cot, a desk with hutch for my son, and the hall stand.  
I have a couple of other projects on the go in this colour too!

Anyway onto the after shots of Paula's cabinet...
The cabinet has glass shelves that I left at Paula's home, so I couldn't have a play with this for the photos...probably just as well, I love it already and if it had my things inside it...it may never leave my place ;)
I masked the glass inside and out in order to do a tidy job.  Sometimes for say a mirror I will just paint without masking and then razor the paint off the glass before it cures - in this case that would have been way to messy, given that there are leadlights on the panes.
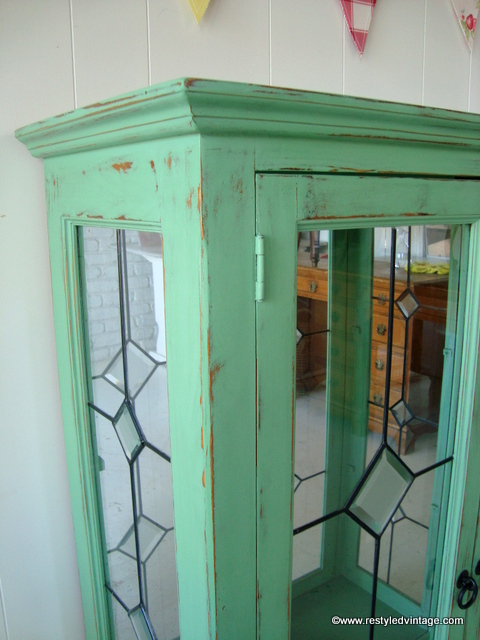
I didn't remove the masking tape until after I had distressed, waxed and buffed this, in order to protect the glass from being scratched by the sandpaper, and to stop excess wax getting on the glass - messy to clean off!
The insides are all painted, including bits you wouldn't normally need to paint, but do when a mirror is involved - don't want an unpainted bit to be reflected in the mirror!


(Yep the handles are crooked - I haven't tightened them yet, to give the paint and wax a chance to cure a bit first)
I distressed this piece by hand using 240 grit sandpaper and then a fine 3M Softback Sanding Sponge.  
These give the most super smooth finish you can imagine, and are very pliable, kind of like a cloth - great for rubbing along mouldings etc.
Stuff with mirrors are hard to photograph, aren't they!

Paula has a beautiful collection of china that lives in this cabinet, and she has promised to share a photo of it refilled once I drop this back to her...when she does, I will be sure to come and add it to this post :)

September 7, 2013

Hall Stand for Paula

Hello!  This week I've been working on a custom job - this gorgeous hall stand.  
Paula, the owner had visited my market stall a few times and liked my work. She contacted me recently with a few projects she wanted me to work on.  All the pieces are gorgeous and I feel so honoured to be responsible for their transformations :)

Paula had seen my 'Sweet Pea' Green Bookcase and decided that was the colour she wanted for her hall stand. I think that was an excellent decision, because after two coats of paint and some seriously energetic hand distressing then waxing, this is how it looks...


To finish, here is a good old side-by-side comparison.  Paula was absolutely thrilled with her 'new' hall stand, and immediately insisted I take a plate of brownies home with me (truth be told, not all of them made it home...they were so delicious!)
I also brought home another piece of Paula's furniture, a lovely china cabinet which she wants painted in the same green.

Better get painting...see you again soon!


February 10, 2013

Rainbow Pastels Dining Suite

I don't know how but I seem to have missed doing a post on this dining suite as soon as I had completed it...oops!

I picked up this gorgeous pine farmhouse table along with some rattan bentwood chairs which were awful and didn't suit the table.  I got rid of those, knowing that I would find some better chairs without too much trouble.
The table was in great condition, it just needed that golden honey colour removed, and oh how I love to do that!
I started by stripping the tabletop with paint stripper.
I sanded the legs and apron.
Sorry about the shadows, but you can see the table looks better already all stripped back!

I primed and painted the legs and apron in my favourite off white, then lightly distressed before sealing with wax.
Here is the table with just primer on it.  The top is still in its natural state.
I lightly distressed the legs by hand, then waxed them.  For the tabletop I followed this procedure that I have used several times for achieving that perfect shade of french willow grey that is so popular amongst shabby chic and French country fans. 

I didn't take any before or during photos of the chairs, but they were just ordinary brown colonial style kitchen chairs, in good solid condition.  I sanded these back then primed and painted them each in a different pastel shade, something I had been wanting to do for a while...I got the chance to do some here for a client and I wanted to do it again, with a couple of extra colours thrown in.
I distressed each chair by hand (a huge job!) and then sealed them with two coats water based poly. They have an absolutely gorgeous smooth feel and look which is hard to capture in photos.

Here is the suite all done...
I am thrilled with how the dining suite has turned out, it just has such a happy feel to it.
This suite is for sale, please contact me if you are interested in viewing.


November 1, 2012

Before & After: French Country Style Dining Table


I've had this table for quite a while...I kept finding handy spots for it in my own home as a sewing table, a desk, and a second dining table before one day a couple of months ago I decided its time had come for the makeover I had been envisaging ever since I spotted it for sale.

I started off by stripping the honey coloured varnish off the tabletop...always a pleasure to get rid of this!

In the above shot you can see the nice wide planks that the tabletop was made out of...I love the character of these.
For this stripping job I used a heat gun and sander to remove the varnish fully.  Sometimes I choose to use paintstripper but I find the heatgun quicker and easier (and cheaper!) for some jobs.  Heatguns are particularly good when the surface you are stripping is flat and has a fairly thick even coating on it.  Obviously paintstripper is better for more detailed pieces...in the last couple of weeks I stripped an ornate sideboard right back to bare timber and that took lots and lots of paintstripper...too fiddly for the heatgun!
I didn't take photos of the middle part of the process, but once the tabletop was stripped, I flipped it upside down and primed and painted the legs, before lightly distressing them.

To get the whitewashed look on the tabletop, I used the process I developed and explained in this post.

Here it is, all done...
The table goes really well with these industrial style stools that I had reupholstered in a taupe gingham oilcloth.
The table legs are the same colour as the sideboard in the background 
(as at 1/11/12 this is still available for sale).