
In this post I mentioned for the first time that I have a bit of a thing for vintage caravans, and that I renovated one a few years back. Even though it was long before I started Restyled Vintage, or writing a blog, I took lots of before and after pictures, so wanted to share them here. Please bear in mind that these pictures weren't taken with an audience in mind, and they were taken a few years ago...there's a lot of things I'd do differently now, and cannot wait to do with our next van!
First of all, a correction to the date we purchased our caravan. I had mentioned in that last post that it was early in 2009. Upon checking my photos (lucky they have a date stamp on them!) have just realised that it was actually December 2007...oops! Doesn't really make any difference to you reading this but I like to have my facts straight...I've edited the dates in my previous post. My children were 3 and 1 then...seems like a very long time ago as we are counting down to a 10th birthday next month!

Our van was a 1973 Oxford Deluxe 16 footer. The first time I set foot in it was actually back in 1999 when I met my husband - at the time his family had purchased land on Bank's Peninsula, on which we ended up building a joint family holiday home, and the caravan acted as a builders' hut. For the first two years of our relationship we spent many, many weekends acting as builder's labourers helping to get the place built. I made a fair few cups of tea in that van, and may have also snuck in there for a few naps when I got sick of building, or when a Southerly whipped straight up Akaroa Harbour (hated those!)
Once the house was built, the caravan was towed back to my in-laws' place where it sat unused for several years. After my mother-in-law sadly passed away in 2007, my father in law had no desire to keep it and luckily for me, my husband didn't take too much convincing that we should purchase the caravan and restore it to its former glory. Yay!
Due to all the years it had sat unused, it was in a bit of a sorry state. Mice had moved in...yuck!


There were things sitting on the paper lining the shelves but you can see how the mice have nibbled all around the edges!


(Anyone hungry? Blerk!)

I stripped out the carpet, the venetian blinds, old blankets, sleeping bags and camping supplies and got to work scrubbing and disinfecting every single centimetre of the van. Literally - I used an old toothbrush to get into all the crevices. I wanted to know that it was totally clean and fresh before I started painting, or putting my family in there to eat and sleep.


Sorry that this photo is blurry but it is the only one I have of the yuck under the fridge and had to share it ;)


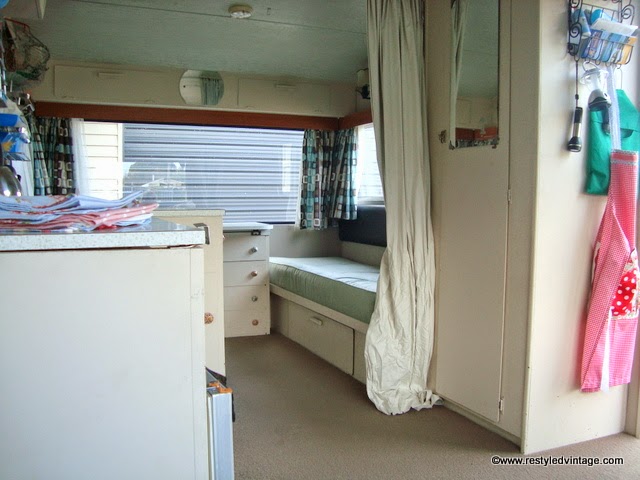
After I had stripped out and cleaned the van, I painted the interior. I first primed it with a new to me at that stage product called Smooth Surface Sealer from Resene. This primer/sealer sticks to smooth surfaces and at that stage was the only product available locally that promised this (and delivered). Of course there are more now, and I haven't used Smooth Surface Sealer for years, but only because I can't get it near where I now live. It really is great stuff and for our next van project I will try and hunt down a tin, it works so well on veneer which caravans tend to be full of.
After priming the walls and cabinetry I painted them with a couple of favourite neutrals of mine at the time - Dulux Raw Cashew Nut for the walls and Dulux Cape Colville for the cabinetry. We had used these in our home renovation (which was happening at the same time as the caravan project!) and it made sense to use what we had (the budget I was working with to renovate the caravan was basically $0).

I found this hanging rack at The Warehouse on clearance for $15. It was perfect for the van and provided a great deal of practical storage - something very important in a caravan!

Luckily for us the squabs were in perfect condition - by some miracle the mice had left them completely alone. I cleaned them with upholstery cleaner to freshen them up, and called them done.

This couch was the 'double' bed. The base slid out by pulling on the black metal legs and the back cushion lay down and became part of the mattress. It was a fairly small double and not the most comfy for two adults, so I added a hinged extension to the timber part that slid out (a piece of MDF, no photos sorry), so it came out as far as the side of the fridge, and made a proper width double bed which fit a double bed mattress on it. I bought a second hand double bed mattress cheaply and for longer camping trips we left the couch squabs at home and had the double bed set up permanently.
As mentioned the van had venetian blinds in it when we got it. They are practical but I hate them so they had to go. Because of said $0 budget I had to find a cheap solution for window coverings, and I needed something that would tie in with the green squabs. I found the ideal solution in a couple of duvet cover sets, I think they were $30 each. I used one to make the curtains and the other I left whole to use as bedding in the van. They had a retro feel going on which suited the age of the caravan, and the rounded square pattern also echoed the pattern in the formica bench and dining table. You get a lot of fabric in a duvet cover for the price. I lined the curtains with plain white curtain lining.

You can see that some of the curtains have a bigger print than others - the smaller print was the reverse of the duvet. tight budget = needs must! I also put net curtains in - I don't love them at all but the privacy they afford is nice. We didn't take bags with us when holidaying in the caravan - at each end of the van up high in the curve of the roof were compartments with drop down doors. Four people in our family = one compartment each for our clothes.

A friend's husband worked in a carpet store and managed to find us a short end of carpet and lay it for us, all for $100. Some of you may be thinking why on earth would she want carpet in a caravan, and fair enough. I'll tell you. I am a Kiwi, I love carpet, but only 100% NZ wool carpet. It's cosy and homely. As soon as we bought our home in Australia, we put 100% NZ wool carpet in our lounge and bedrooms. Hard floors throughout a home are cold and clinical to me, even in a warm climate. It's cold a lot in NZ, especially in a caravan. Having a vinyl floor would make it seem even colder. I never found it hard to keep clean, even with two tiny kids. It's easy enough to vacuum out thoroughly once home or you can always take a dustbuster (hand held vacuum cleaner) on holiday with you if you so desire (yes, I did!!) I think the key was not to be too precious about it; it is a caravan for having holidays and fun in. So what if the carpet shows some signs of that after a few years - if the carpet does get trashed, it is pretty cheap to replace. The pros far outweighed the cons for me. Now we are in Australia, I will have to wait and see what I feel like doing for the flooring in our next van. There are so many lovely laminated planked floor products now that I would love to try some out, so we'll see.

The black vinyl back cushions were in good condition but very faded. I repainted them using vinyl paint that I purchased at Repco - I can't remember the brand or name of it and Google isn't helping - sorry. It's brilliant stuff and been around for years. It really works. I would have liked a different colour, maybe a light neutral but there wasn't a great colour range at that time.

This is the best photo I have showing the carpet. The photo is taken from outside the van looking in the doorway. I mounted a handy little rack on the edge of the wardrobe (which I converted to a pantry) and this provided more great storage. This tiny little rack provided storage for our keys, sunblock, insect repellent, torches, travel maps/brochures, and my apron. That's one of the many things I love about a caravan - you have to have a place for everything, and keep everything in its place. You have to travel with everything you might need, but nothing you don't need.
Early on, despite the budget restraints, I decided that our van was not going to be a dumping ground for mismatched junk that we no longer wanted or needed in our home. It was going to be cute and I would only have things in there that were needed, useful, and made me happy to look at or use.
(Yes I did think the Dora plates were cute back then - my kids were 3 and 1 remember!)


Here's the wardrobe that I converted into a pantry - I mean - who needs hanging space in a caravan? I bought one of those cheap plastic rolling carts which I actually had to build inside the cupboard in order to fit it in. There were already some little shelves built into the side wall of the wardrobe, seen above. I used those for heavier items like cans, and lighter things like pasta, chips and biscuits would go in the baskets. In the very bottom part I stored towels and linen, rolled to save room (the wheel arch was in there). In the top part we kept matches, a first aid kit, string, sellotape, duct tape, that sort of thing. As you can see, I gave the entire cupboard a paint job too.

The caravan had a great awning which we slept in during our first trip away when our little boy was still in a cot - we set the cot up in the van in the only available floor space which was in front of the kitchen bench.

The little narrow cabinet on the left hand side of this picture housed the awning and our tool kit. The awning had to be folded very neatly and tightly to fit in here but it did fit.


For shorter trips we sometimes just set up the roof of the awning to provide some shelter and shade.

This set of drawers was fitted into the centre back of the van between the single beds/seats. As you can see some of the drawer fronts were broken. Back then I had no clue how to fix them but now it is bleedingly obvious and simple to me...funny what a few years of DIY experience does for you ;) Painting them and adding cute knobs made them a bit better, at least! In these we stored more linen, board games, toys and books. The table was hinged and folded out easily. A metal leg fitted into a bracket underneath to support the table when it was up. This leg was stored in a little cavity down the side of the drawers when not needed.


Pull down cupboard doors under the beds gave us plenty of storage for sleeping bags and pillows not needed during the day. The part the squabs sit on actually lifted right up too, for easier access. I had these compartments lined with carpet also.

The small drawer on the sticky out bit of the kitchen bench stored our cutlery. Even though the drawer looks small it was very long and fitted all we needed it to with ease.

Cute little dish rack and the home baking cupboard :) (This is the cupboard also shown earlier in this post, with the mouse-eaten paper in it).

The sink cupboard, also shown earlier, looking much fresher here. This cupboard had plenty of room for pots, frypan, bowls and platters. The dishwashing items would normally be stored in here too, not sure where they disappeared to!
There was a curtain track on the ceiling of the caravan which proved useful - I found an old plain curtain that worked as a dividing screen to close off the kids' end once it was bedtime. There were a fair few times we had a little face peering round the edge of the curtain back at us, but they learnt eventually that curtain closed meant be quiet and sleep!


I know it is a bit hard to see, but I painted the inside of the caravan door with chalkboard paint. When camping the door is mostly open anyway so chalk dust inside the van wasn't really an issue. The kids made good use of it, as you can see!
The outside of the van was solid but the paintwork was very tired and I would have loved to have it repainted. Budget wise that just wasn't an option so I did the best I could - I used a waterblaster to give it a good clean (which took some paint off - oops!) and then I cut and polished the entire van by hand - big job!

You can see here that I cut and polished the van with the door open...lol. I did finish that last bit but stopped to take a photo of the difference it made first!

I gave the gas stove a good clean and it was as good as new. Same with the fridge although if I knew then what I do now I would have repainted that awful mustard colour with a spray paint, and found something to replace that broken piece of trim along the top of the door.
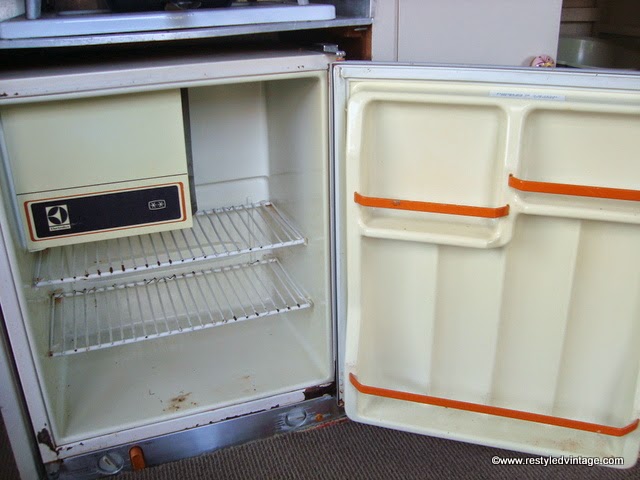
The fridge was a 3-way - 240 volt electric, 12 volt (hook up to your car) and gas. We never managed to work out the 12 volt system but did run it on both mains electricity and gas. I actually had a certified gas fitter replace the pipes and fittings on the fridge and stove and give the system a safety check before we used them - I wasn't having my family sleep near a gas appliance that wasn't checked and deemed safe. The fridge did get quite warm and sometimes wouldn't work the best so I was advised to cut another vent hole in the wall of the caravan (the existing vent holes were not lined up properly with the hot part of the fridge motor). That was scary for a fledgling DIYer but thankfully worked out ok, and helped the fridge work better. I also had an electrician check over the 240v side of things to make sure everything was working and safe.
As far as road-worthiness, we had an unwelcome shock to the tune of about $1000 the first time we got a Warrant of Fitness check - I can't remember the details but something to do with the wheels and axle wasn't right and needed fixing. Ouch but at least we knew it was safe once fixed.
Our van was very watertight, something that is most important with a caravan - once it leaks, it rots and can be very hard and expensive to put right. Because this van had been in the family for a long time, we definitely knew that side of the history which was handy.
This post may be my longest ever so I think I will stop now...I hope you've enjoyed reading about my caravan project, and looking at the pictures. If you have any questions about the process, please ask me. If you have done or are doing your own caravan project, I'd love to hear about it!
Wow Karen it just looks amazing! I'd love an old caravan, though I have to say I don't know that I could tow it!! Maybe just for the driveway!
ReplyDeletethanks Catherine, I think I am even prouder of it now than I was at the time! A caravan just for the driveway is ok...the kids loved playing in ours like it was a playhouse :)
DeleteCool. I love our Retro Caravan too and doing it up is on the list. Modern one's are not for me!
ReplyDeletethanks Maria...modern ones have no charm!
Deletelooks excellent...Hubs and I are doing an 80s foldaway van up at the moment...not half as cool as that though :)
ReplyDeleteawesome, lucky you, have fun!
DeleteThanks for sharing. I enjoyed the story and the photos :)
ReplyDeleteWow, it's been really difficult to find quality vintage caravan blogs, but your story is really amazing. Not only is it a great inspiration to read about your project, but to scroll through all your other crafts on the site, and all the tutorial. This will definitely stay in my bookmark bar. As you can probably guess, we too are doing a vintage caravan, and a blog. (ourmissdaisy.blogspot.com) I have linked to here on it. Thanks!!
ReplyDeleteI really enjoyed reading about your renovation. We bought a 1970's caravan earlier this year to share with our family. I have the job of painting and sewing, while my husband and son in law sand and paint the roof. My husband is a joiner which is handy but we want to keep the caravan as natural as possible, so won't be tinkering with the joinery unless really necessary. I came up with an idea to use wallpaper, but am finding it really hard to get vintage or retro paper that doesn't cost $100 a roll. My daughter wanted venetian blinds, so I have hunted around for cheaper ones as I also want curtains to dress up the windows. However she likes clean lines and I am the opposite, so we will have to work on that one.
ReplyDeleteYour blog is the closest I have come to finding a caravan similar to ours, it is interesting to read what you have done and will spur me on to get the caravan ready for the Christmas holidays. I loved your idea of using bed covers for curtaining. We had some water damage inside, but nothing too bad. Our ply on the walls has cracked in some places, so that is why I want to wallpaper instead of painting, however after reading your blog I may consider painting again.
Thanks for sharing.
Stumbled on your post when searching for inspiration (and advice) for our caravan renovation. Your caravan looks just fantastic. One quick question for you - you know those drawers fronts that you mentioned were bleedingly obvious and simple to fix now that you have more DIY experience . . . how would you go about fixing them please? We have a tonne of drawers and doors in our caravan that look just like that and I would love to know the best way to sort them out.
ReplyDeleteThat is really nice to hear. thank you for the update and good luck. Renosingapore.com
ReplyDeleteFurthermore, certified professional remodelers would implement new innovations and techniques that would turn your kitchen remodeling unique and stylish. construction contractors fontana
ReplyDeleteLook for an appliance that very nearly suits your need to cut on cost. Visit showrooms, appliance outlet stores, and checkout online appliance stores to see what is available and refine your need appropriately. FREEZER REPAIR IN SAN DIEGO
ReplyDeleteSkylights bring in natural light and reduce electricity use. ExcellentChoiceConstruction.com
ReplyDeleteWhat a fantastic transformation! There’s something so special about giving vintage caravans a new lease on life—combining charm with clever design. At Niven Builders, we’re passionate about creative renovations, whether it’s a full-scale home or a unique mobile project like this. Truly inspiring work!
ReplyDeleteAbsolutely love the charm and character in your vintage restyling projects—such inspiring transformations! Your creativity really brings new life to old pieces. I’ve shared similar passions on my own site, where I dive into vintage and modern style fusions. Would love for you or fellow readers to check it out and share your thoughts! Keep up the amazing work.Peterniven
ReplyDeleteCool
ReplyDelete