Showing posts with label Desks. Show all posts

August 19, 2013

Distressed Vintage Green Desk

As you know, I am always painting furniture, it is what I do.  What I don't do, nearly often enough, is paint furniture for my own home...sure, I have lots of pieces I'd like to paint, but they keep slipping down the list as I am kept busy painting pieces to sell, and painting pieces for others.

Not that I'm complaining, I am thankful and grateful that I get to do what I love as a job!

I have a mental list of things that I am on the lookout for for my own home, and one of these things was a desk with a hutch for my little boy.  A few weeks back, I walked into one of my local haunts, and this was waiting for me...
Granted, it is a little on the large side, but it was solid timber, had lovely t&g backing on the hutch, and was a great price. It had to come home with me!

My son has great taste, like his Mum ;)  When I did this bookcase, he fell in love with the colour, and requested the same for his desk.

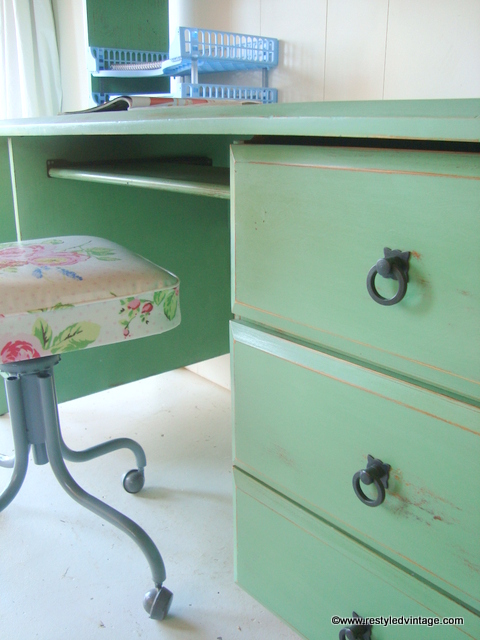
I mixed up my favourite blend of Annie Sloan Chalk Paint® in Duck Egg and Antibes Green and painted on two coats, before distressing and waxing with Annie Sloan Clear Wax.

Here it is...
I styled the desk up how I would like it to look, but it will look very different when my 6 year old boy has had his way with it ;)  I have promised to share photos once it is in his room. 
He is sitting beside me right now and just saw the photos of 'his' desk and said 'oh why have you got all that pretty stuff on my desk?' haha!

Once the desk is in his room I am going to make a custom fitted notice board to fit in the gap between the desk top and bottom of the hutch.


The chair belongs at my desk, and is a keeper. I had it done a few years ago and absolutely love it.


Obviously the shelf at the bottom for the computer tower is no longer required in this day and age lol...still working out what to do with that.  I will probably install a shelf in there and try and find some baskets to fit.  If you have any other ideas, I am all ears!
Here it is in my showroom this morning with the bookcase of the same colour...this sold some time ago and it is being picked up this week.

Think it might be time to paint something a different colour now...although I do have a custom job to start on in guess what, the same colour :)  

Just as well I love it!

July 25, 2013

Ship Desk

I spotted this cute little desk last week while out treasure hunting - the second I saw it, I knew it was coming home with me. 
I loved its cute retro lines and I had a vision that would make it even cuter.
Why on earth have I called this piece a Ship Desk? Funny you ask that...this is why ;)
It has a ship, delicately pieced into the desk top.  I've never seen anything like it before.  
As cute as it was though, it really didn't fit my vision.

The direction I took with this desk was inspired by the last desk I did, here
This one needed a top and I made a new planked one for it, which I distressed and stained.
I decided to do a similar thing for this new desk, to hide the ship.
This time, after I distressed and stained my 'planks' (new dressed pine from Bunnings) I painted them with Annie Sloan Chalk Paint® in shades of blue, green, grey and white.
Here's how it looks now...


 I've teamed the desk with one of the chairs from this dining suite and I think it suits it perfectly so I think I will be grabbing another chair like this and painting it Paris Grey :)

This desk is for sale, please email karen@restyledvintage.com for details.

Sharing at

June 10, 2013

Retro Desk Makeover

If you follow my Facebook page, you may have already seen this project, I am just a little bit behind in posting about it on my blog, sorry!

I found this little desk locally via Gumtree.
It had no top, and the back right leg was hanging on by a thread.

As soon as I see a piece of furniture that I can see potential in, I get a vision in my head of what I am going to do with it, and how it will look when it is finished.  The vision I got from this desk was a white painted body with a grey and white dotty oilcloth top on it.  As soon as I got it home, I ordered the oilcloth but found it was out of stock.  I had some other oilcloth in my stockpile already but none that I thought suited this desk so I went back to the drawing board.  In actual fact, the desk just sat for quite a while, with nothing happening to it.  

After doing this chair in Antibes Green, I knew the desk had to be part of the matching set.

I fixed the desk leg with glue and new screws, and painted the desk body in two coats of Antibes Green, and the drawer fronts (and handles) in Old White.

I had to make a new top for the desk, and decided a planked top was the look I was after.  I purchased some new dressed pine boards for the job and planned to stain and distress them a bit.
You can see in the below picture that I've started to stain the desk top - I stained the edges of each board before I attached them to the desk body.  The stain I used is Feast and Watson Prooftint in Oak.
I used my air furniture staple gun to attach each board to the desk body.
(*Edited to add that I set the pressure on my compressor up enough so that the staples sunk down into the top just a little, then I used some dark wax to fill the holes. I could have used matching wood filler to hide them completely but I like the rustic bit of character they add.)


Once my new desktop was attached I set about beating it up a bit, using a spanner, a couple of large drill bits, and some chain.  I just picked them up and dropped them onto my fresh new desk top...it was lots of fun! 
The result was just a few random dents and dings here and there - I didn't want to go overboard.

Once I finished applying three coats of stain, I waxed the whole desk with Annie Sloan Clear Wax.  

Here it is all finished, and paired up with the chair. The shine on the desktop now is amazing, and I'm really happy with how it turned out - better than my initial vision, for sure!


February 4, 2013

A fresh new look for an old desk

This is a custom job that came to me via the article in the Port Macquarie Focus Magazine...the lady had read the article then made a special trip to the markets to talk to me about this little desk...
She had owned it for about 50 years and had completed the current paintjob herself about 40 years ago.  She saw some other white pieces I had done and decided that this desk needed a new look.
The green finish was chipped and worn so I decided it needed to come off completely.  I did this by using paint stripper and sanding.  When I was uploading the photos for this post I found this one I didn't even realise my daughter had snapped...there I am hard at work!  All that stuff on the ground is the old paint...I keep telling you that this is a glamorous job, do I not? ;)
Once all the paint was gone I cleaned the desk with methylated spirits on a clean rag to get rid of any paint stripper residue, then primed it with my favourite Zinsser BIN but found that I got some tannin bleed through in a couple of spots so I did another primer coat of Zinsser Cover Stain which fixed it.

Then onto the top coat (well 4!) of my favourite off white.  A light distressing by hand with 240 grit sandpaper followed, then I sealed the inside with water based poly and the outside with wax.

Here it is now...

Once again, white paint fixes everything!  

If you have something you'd like painted and don't want to do it yourself, I can do it for you...email me with photos and I will work what it will cost :)
(Location Port Macquarie and surrounds, NSW Australia)