Showing posts with label Dining Suites. Show all posts

July 16, 2013

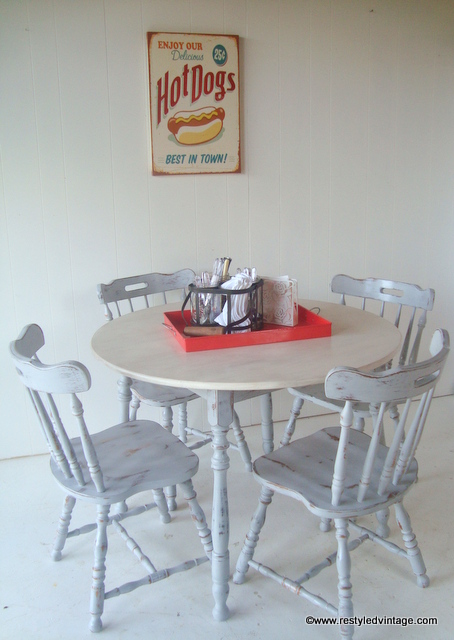
Paris Grey Dining Suite

Hello, hope you are all well...it is the first day of school for Term 3 for my kids today.  
We've enjoyed the holidays very much but just quietly I am enjoying today too ;)

I had a bit of a break from painting in the holidays which is nice for a short while, then I miss it terribly and cannot wait to get back into it!  I have quite a few custom jobs lined up at the moment which I am very grateful for, and now the kids are back at school I am looking forward to getting stuck into them.

I did sneak this transformation in last week, and have just managed to get photos of it this morning.  You would think after several years I would remember to take a 'before' shot of each project, but for this one I didn't, so we can skip straight to the pretty 'after's ;)

This was my first project using Annie Sloan Chalk Paint® in Paris Grey, and I love it...what's not to love about a pretty grey, especially when teamed with white.  I used a watered down mix of Old White on the tabletop, which I sanded back to bare wood.  I waxed the whole lot with Annie Sloan Soft Wax in clear, and it's hard to tell in my photos but when you buff after using this wax you get the most amazing shine on your pieces.

I distressed the suite quite heavily because I think it needed to be with this colour and style.


I am a total sucker for vintage-style signs...just cannot help myself, they are so cute!
How can you not love that?
I love them almost as much as I love bunting ;)


June 27, 2013

Beachy Bookcase and Dining Suite

Follow my blog with Bloglovin

I've had a busy week working on a client commission plus projects to stock in the shop.  I'm finding since using Chalk Paint® that my enthusiasm has gone up a bit and the excitement of getting a piece finished is having a positive effect on my productivity!

This dining suite belongs to a client who wanted it restyled into a white shabby chic beachy look with grey washed tabletop.
Her kitchen/dining area was painted the most gorgeous shade of baby blue and had a gorgeous beachy feel.  Lightening up this dining suite was going to finish off her space perfectly.

I got to work stripping the tabletop back to bare wood.  I used paint stripper, my heat gun and finally my orbital sander to get it done.
Here it is, nearly stripped back enough, you can see in the photo that there are still slight marks on the table...don't want those there!  A fine grit sandpaper got those out.

I painted the chairs and table legs with 3 coats of Chalk Paint® in Old White, distressed them 220 grit sandpaper then finished them off with a 'Fine' 3M sanding sponge.  I cleaned off all the sanding dust then waxed with Annie Sloan Wax in Clear before buffing with a clean dry cloth.**  Hard to tell in my photos but the shine is amazing and they feel super smooth.

**re-reading my explanation might make it sound quick and easy.  I can assure you there are many many hours of hard physical,dusty and fiddly work involved in this transformation, just in case you were wondering ;)

The tabletop got the same treatment I have explained here.  I love this look.  
(That also took much longer to execute than it did to type it out!)
So much nicer than just doing the table all white.

Here is the suite now...


The bookcase you see above is something else I've just completed today.  I picked it up last week looking like this...

After a couple of coats of Old White and some wax, it looks much cuter :)

Two coats of Old White straight onto darkish timber, once waxed, gives quite a translucent 'whitewashed' effect which I like for certain pieces.  The three coats on the table legs and chairs give a much more 'solid' colour white.


Weather permitting, we are delivering the dining suite back to the client on Saturday...here's hoping she likes it (I always worry a bit!) The bookcase is for sale and if not sold prior, will be headed to La 'Bella Petite Boutique on Saturday too.
Follow on Bloglovin
Shared at Lilyfield LifeSavvy Southern StyleBlue Egg Brown NestElizabeth and Co and Miss Mustard Seed

February 22, 2013

Client Commission: Dining Suite for Ian

Today I've got a very different project to show you - well it feels different to me, anyway.  A lovely man named Ian approached me at my market stall a couple of months ago, and asked if I would paint a dining suite for him.
It had 4 chairs but for some reason only one made it into the before photo.  You get the idea, I'm sure.
When I went to his home to quote a price for the work, he showed me where he wanted to put it - on an outside covered patio area.  He wanted it to match the colours of his home which was a terracotta coloured brick with cream mortar, and cream patio railings and fences.

The cream colour was easy - we used Colourbond Classic Cream which was the exact cream colour of his fences and railings etc.  I left him to choose the terracotta colour, and he decided upon Dulux Great Dane.
I got to work sanding the whole suite back, cleaned it thoroughly, then spray primed it.  I haven't used my spray gun in quite a while and it was great getting it out again. Spraying is obviously quicker than hand painting, and gives a smoother result which is what I needed for this project as the client wanted a clean looking non-distressed finish.  
*That is not to say you can't get a smooth finish with a brush, you absolutely can.  All you need to do is use a good quality paint brush, have a steady hand, and sand with a fine grit sponge (then wipe with a clean wet cloth) between coats.*
Spraying does have its downsides though.  You need an area to do your spraying in (I've made a spray booth in my garage) and it needs to be sealed, clean and dust free.  Spray painting creates a lot of 'dust' as the paint particles fly all around and don't just end up on the furniture.  As a result, you use around 30% more paint when spraying vs hand painting. Keeping your pressure at the right level (high enough to get the paint out nicely and low enough not to blast the paint everywhere) is important and takes a bit of trial and error. As does thinning your paint to the right viscosity - too thick and it won't come out of the gun nicely, and too thin and it will run.
I lined up a couple of little tray tables to prime while I had my gun out.  It is time-consuming and fiddly to clean properly so I like to make the most of it while it has paint in it!
This is my spray gun.  It is about the third gun I have owned and the first one I have learnt to look after and keep properly clean!
I've said this many times before, but I always work on tables upside down first, so I don't have to put a newly-painted surface down and risk damaging it.  It also makes it easier to get in and around the table legs and underside of the table, which I always paint to freshen it up (the undersides of tables are often filthy, especially around the edges).
Here is the part where I got busy and stopped taking photos, sorry!  The table top and seats were to be terracotta and the legs and chair backs cream, so I masked up the chair seats and got to work spraying the chairs with the cream colour.  I also spray the chairs upside down to start with, it is easier to get into all the nooks and crannies that way.  I didn't need to mask the table top, I just sprayed the cream colour while it was upside down, then flipped it over and hand painted the table top in terracotta.
Once I had finished the cream on the chairs, I removed the masking (I used cling film and masking tape)  and hand painted the seats in terracotta, then sealed them (and the tabletop) with water based poly.  The paint and sealer I used is specially formulated for use outdoors - although this suite will be undercover I wanted to make sure it will stand up to the elements.

So here it is, all done
Whilst these colours are not my favourites, I think it looks lovely and will look perfect in Ian's outdoor living area.  It was fun for me to go outside of my usual colour palette and do something different.  It was also fun to do a cleaner style, as I do tend to distress everything I lay my hands on!  

I am thankful to Ian for the opportunity to transform his dining suite, which has allowed me to show off a different side of my painting skills.  Here's hoping he likes the result!


February 10, 2013

Rainbow Pastels Dining Suite

I don't know how but I seem to have missed doing a post on this dining suite as soon as I had completed it...oops!

I picked up this gorgeous pine farmhouse table along with some rattan bentwood chairs which were awful and didn't suit the table.  I got rid of those, knowing that I would find some better chairs without too much trouble.
The table was in great condition, it just needed that golden honey colour removed, and oh how I love to do that!
I started by stripping the tabletop with paint stripper.
I sanded the legs and apron.
Sorry about the shadows, but you can see the table looks better already all stripped back!

I primed and painted the legs and apron in my favourite off white, then lightly distressed before sealing with wax.
Here is the table with just primer on it.  The top is still in its natural state.
I lightly distressed the legs by hand, then waxed them.  For the tabletop I followed this procedure that I have used several times for achieving that perfect shade of french willow grey that is so popular amongst shabby chic and French country fans. 

I didn't take any before or during photos of the chairs, but they were just ordinary brown colonial style kitchen chairs, in good solid condition.  I sanded these back then primed and painted them each in a different pastel shade, something I had been wanting to do for a while...I got the chance to do some here for a client and I wanted to do it again, with a couple of extra colours thrown in.
I distressed each chair by hand (a huge job!) and then sealed them with two coats water based poly. They have an absolutely gorgeous smooth feel and look which is hard to capture in photos.

Here is the suite all done...
I am thrilled with how the dining suite has turned out, it just has such a happy feel to it.
This suite is for sale, please contact me if you are interested in viewing.


November 1, 2012

Before & After: French Country Style Dining Table


I've had this table for quite a while...I kept finding handy spots for it in my own home as a sewing table, a desk, and a second dining table before one day a couple of months ago I decided its time had come for the makeover I had been envisaging ever since I spotted it for sale.

I started off by stripping the honey coloured varnish off the tabletop...always a pleasure to get rid of this!

In the above shot you can see the nice wide planks that the tabletop was made out of...I love the character of these.
For this stripping job I used a heat gun and sander to remove the varnish fully.  Sometimes I choose to use paintstripper but I find the heatgun quicker and easier (and cheaper!) for some jobs.  Heatguns are particularly good when the surface you are stripping is flat and has a fairly thick even coating on it.  Obviously paintstripper is better for more detailed pieces...in the last couple of weeks I stripped an ornate sideboard right back to bare timber and that took lots and lots of paintstripper...too fiddly for the heatgun!
I didn't take photos of the middle part of the process, but once the tabletop was stripped, I flipped it upside down and primed and painted the legs, before lightly distressing them.

To get the whitewashed look on the tabletop, I used the process I developed and explained in this post.

Here it is, all done...
The table goes really well with these industrial style stools that I had reupholstered in a taupe gingham oilcloth.
The table legs are the same colour as the sideboard in the background 
(as at 1/11/12 this is still available for sale).