July 22, 2010

Retro Red Polka Dot Dining Suite

I just picked up these chairs from the upholsterer and once again he has done an absolutely amazing job.  I decided to team the chairs with a grey retro table that I have had for a while....I think they look super cute!  They are for sale here.

My magic upholsterer man is currently working on a retro kitchen step stool in a very 'Cath Kidston' style oilcloth (the same oilcloth that I put on this Little Lamp), two little round kitchen stools, and a timber framed daybed that will have a real french country flavour....watch this space!

As for me, I am going to go paint some furniture....so have a great Thursday everyone!

xx Karen

July 20, 2010

Frame and Candlestick Makeover

I had a client come to me with some home decor items that she still really liked the shape of, but not so much the colours, as they no longer fit in with her newly renovated home.  So I was hired to make them over from brown and gold to white and silver....and here they are...
A pretty successful improvement, I think!

xx Karen

July 17, 2010

A quick little lamp makeover

I picked up this wee lamp at the local auction on Thursday, along with a gorgeous french style iron vintage bed that I cannot wait to get set up in my daughter's room, a kitchen step stool, and a framed shabby chic flower print.  Sorry, I only have photos of the lamp tonight, will save the rest for when I have some 'after' shots!

Anyway, here is the before shot of the lamp:
What a stunner!  As I have never upcycled a lamp before, I thought I would start small, and simple.  I wasted no time in ripping it to bits...
Then I masked the electrical fitting and cord, and sprayed the base with Rustoleum Spray Paint in Satin White (the one that sticks to anything, fantastic stuff!)  I got too excited and forgot to take photos, sorry!  What I did next was cut a piece of my chosen fabric (which happens to be oilcloth), then sprayed it with spray adhesive, and stuck it to my shade.  Gosh I love that stuff!  Next, I tried it on my lamp stand but it looked like it needed a little something more so I found some matching ric-rac braid in my stash, and hot-glued it around the top and bottom.  Put it back together and here it is:
I am sharing this at 


Funky Junk's Saturday Nite Special

July 10, 2010

Glory box, so far...

Another project I am part-way through, that I wanted to show the progress on.  Here is the 'before':
This is made of mahogany and quite a retro style, much plainer than the things that I am normally drawn to, but I could see this looking gorgeous with some paint-and-new-handle-magic...was I right?
My lovely friend Tracey bought these gorgeous porcelain knobs for me in India...not just these ones, but a selection of designs and colours - I was blown away by her kindness and the efforts involved in getting these to me!

Thanks again, Tracey!

The main part of the box still needs another coat, and the lid needs painting (in the same grey - I love that colour!)  I have painted the inside grey as well.  The lid has a cool little hinge thing that holds it up and stops it slamming, very handy...could be a great toybox!  I must say, painting with a darker colour is so much easier than painting with white or cream...I find I need a minimum of 4 top coats to get a coverage I am happy with (and that is using top quality paints)...but with a colour, 2 coats and we are all good!

But I do love white furniture....
xx Karen

The duchess, so far...

It is not finished yet, but here is the progress.  First, what it looked like when I got it:
It does have two mirror posts, and a lovely bevelled edge mirror...but I had to take the other post off to fit it in the car to bring it home, and didn't put it back on because I decided to paint it with the posts off completely so it could also be used as a sideboard, or chest of drawers, or whatever...without the mirror.  I always paint the backs of my pieces, and didn't like to think of someone buying it, then removing the mirror posts, and leaving big ugly darks strips down the back!  

(Yes I know that they would be against a wall and you'd never see them...but I am funny like that, lol).

Anyway, so it doesn't look TOO bad in that photo above...well here is what the top actually looked like:

That required sanding, and lots of it!  (I must get myself a dust mask!)  Then the painting started....and here it is now, several coats later and not finished yet:
 And a picture of the top, for comparison's sake:
Still needing one more coat I think, then some distressing and glazing, but looking so much better already!

xx Karen


July 9, 2010

Just finished -

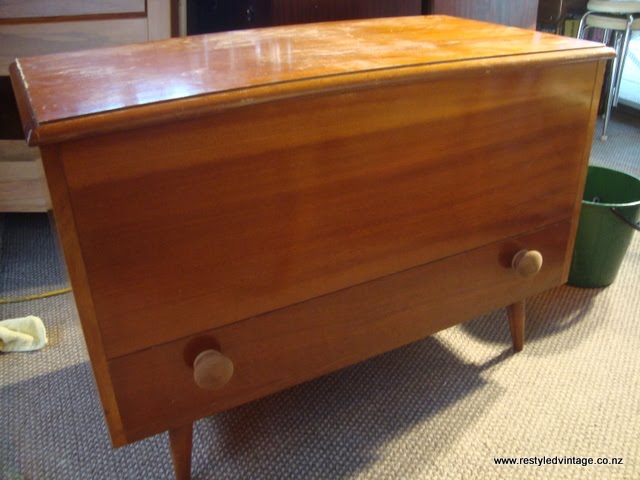
A super cute retro piano stool.  First, a picture of what it looked like when I bought it:

And, now:
What I did with it:

Firstly I pulled it to bits, unscrewing the hinges to remove the lid.   Then I ripped off the old upholstery and padding.  I gave the wooden box a light sand then washed it.  Once it was dry I painted it with smooth surface sealer, then primer undercoat.  

I then did a couple of coats of Dulux Punakaiki on the box, and lid frame, inside and out.   Then I think 4 coats of Dulux Cape Colville over the box and lid, just on the outsides.
 
Once that was dry I sanded to distress on the edges and where I wanted to reveal peeps of the underneath colour (the duck egg shade).  

Then I planned my birdie and love heart design.  I traced them onto baking paper then transferred it onto the box the way I would have done in my school days - by scribbling with lead pencil on the back of the tracing, then holding it on the box and retracing over the shapes again.  Old-fashioned, but it works a charm!  I then painted my birdie and love heart designs using a cotton bud, mainly because I was so keen to see how it would look and I didn't have a small enough paintbrush on hand, lol.  Plus I actually liked the uneven look that it gave the paintwork, as it added to the shabby worn effect I was after.  

When that was dry, I sanded over the pictures, being careful to keep my sanding block going in straight lines so these would show up in the distressing.  I then did a medium oak-coloured wax coat over the whole piece to finish off the wooden part.

Then, the seat.  Pulling all the old staples out of the seat was hard work and the old piece of plywood they were stuck into was falling to bits around the edge so I cut a whole new piece, spray-glued some new foam padding to it, the spray-glued the new fabric to that, folding it under neatly around the edges.  Once that was well stuck down, I cut a contrasting piece of fabric and stuck to the back to neaten it all up and cover the folded over edges of the top fabric.  Then fitted the new cushion into the lid.  

Took some photos, and here it is!

I am showing this off at
Furniture Feature Fridays
and


Funky Junk's Saturday Nite Special


xx Karen

July 7, 2010

Answer to a recent comment


said this: 
Karen, I love the gray as well! Did you dry brush it also or use glaze? Perhaps both? Also, Do you ever top coat your pieces with something clear? 

 I replied:

On this one, after I sanded it, I used a Liming Wax which is a beeswax base coloured white.  There was no dry-brushing or glaze on this piece.  On other pieces I have dry-brushed cream or off white paint to get that limewashed effect, but this time used the 'real thing' and I am pleased how it turned out.  The liming wax has to be used on a deep colour or it just doesn't show up.  I don't normally do a clear top coat because the wax is enough to protect it, and I use a product called Resene Smooth Surface Sealer as my initial coat which means anything you put on next will stick to it and not chip (it is fantastic stuff).  In saying that though, I have just started using a 'glaze' and after my first piece (the Little Brown Side Table) was dry, I stood over it to admire it dripping wet from the rain and a drip landed on the table and washed the glaze off, lol, so yes, I redid it then put a spray polyurethane over the top to seal it :)  I have just about finished a really frenchy style single bed head and end and have glazed that with a water based wood stain so will also clear coat that in poly (non-yellowing).
xx Karen

July 6, 2010

Latest Transformations

Remember these?
After my upholsterer worked his magic with the oilcloth I supplied him with, they now look like this:
Ahhh, much better!  These are for sale here.

This Queen Anne style mahogany coffee table was tidy enough, just not my style.  I love all the carved detail around the top:
It was almost the same to another one (since sold) which I painted like this:
I was pleased with how that one came out but didn't want to do another the same.  I had been inspired to do something in just the right shade of grey after seeing this gorgeous hutch at My House of Giggles.  Isn't it stunning?  Gorgeous shapes, and gorgeous colour.  I can see why Tracey couldn't stop staring at her lovely hutch!  I went to our local paint shop and looked at some colour chips, and then picked out a couple to look at in A4 size (which gives a much better idea than the tiny little squares on the colour charts).  I came home with Resene Raven, and I am thrilled with the colour.  This is what it looks like on the table:

This glory box that I posted a picture of last week, is also part way through a transformation to Raven grey as well.....reveal coming soon!
xx Karen